← Back to Blog
Tips for Getting a Bit More Out of Claude Code
tudy.clubAai
Ddev
Tips for Getting a Bit More Out of Claude Code
Practical tips for using Claude Code more efficiently, from escaping the Yes button hell with settings.json to CLAUDE.md project context, VS Code extension, slash commands, and more.
•4 min read
#Claude
Tips for Getting a Bit More Out of Claude Code
If you're already using Claude Code, your finger is probably sore from hitting Yes. And you might have caught yourself explaining "Our project uses Next.js, TypeScript strict mode..." at the start of every new session. In this post, I've put together ways to cut down on that repetition and use Claude Code more efficiently.
Combining things I already knew with advice I got by asking Claude directly!
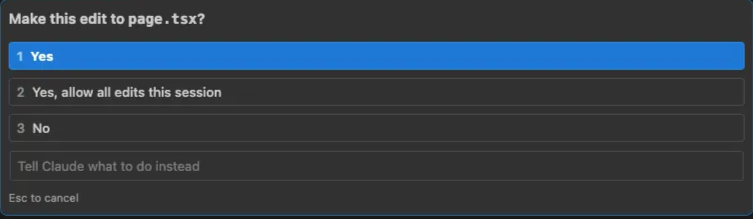
1. Escaping the Yes Button Hell
Claude Code asks for permission every time it reads a file or runs a command. It's a safety feature, but honestly, it gets annoying.
Auto-allow with settings.json
Add this code to project folder > .claude > settings.json. The key is to not include dangerous commands like rm -rf or git push --force. This way, everyday dev tasks are auto-approved while commands that could seriously damage your project still require confirmation.
{
  "permissions": {
    "allow": [
      "Read",
      "Edit",
      "Write",
      "Bash(npm *)",
      "Bash(npx *)",
      "Bash(ls *)",
      "Bash(mkdir *)"
    ]
  }
}
When it still asks
If you run a command not in the settings above, it'll still ask. Instead of hitting Yes every time, select option 2: "Yes, allow all edits this session". This auto-approves the same type of action for the rest of the session.
2. Set Project Context with CLAUDE.md
If you find yourself repeating the project description every new session, try using CLAUDE.md. Create a CLAUDE.md file at the project root and Claude will automatically read it at the start of each session. Write it once, never explain again.
What to put in CLAUDE.md
# Project Overview
Next.js 15 App Router + TypeScript strict mode + Tailwind CSS

# Common Commands
- `npm dev` - Dev server
- `npm test` - Run tests
- `npm lint` - Lint check

# Coding Conventions
- Components use PascalCase
- Functions use camelCase
- No any types
- All API calls wrapped in try-catch

# Notes
- Do not touch src/lib/legacy.ts (legacy code)
- Environment variables managed in .env.local
Hierarchical CLAUDE.md
If your project is large, you can put CLAUDE.md files in individual folders too. For example, src/components/CLAUDE.md for component-specific rules, src/api/CLAUDE.md for API-specific rules. Claude automatically references these when working in those folders.
3. Use It with the VS Code Extension
If the terminal feels uncomfortable, try the VS Code extension. The official extension launched in September 2024.
https://code.claude.com/docs/ko/vs-code
code.claude.com
How to install
- In VS Code, press
Cmd+Shift+X(Mac) orCtrl+Shift+X(Windows) - Search for "Claude Code"
- Install the official extension published by Anthropic
- Launch the extension and log in to Claude
What's good about it
- View code changes instantly with VS Code's diff viewer
- Chat in the sidebar while editing code
- Mention specific files with
@filename - Run different conversations in multiple tabs simultaneously
When you type claude in the terminal, the extension connects automatically. Choose whichever you prefer -- terminal-based CLI or VS Code UI. I personally use the VS Code extension because the viewer features are nice.
4. Useful Slash Commands
Type / in the chat to access various commands. /clear in particular is one you should use as a habit. When previous conversations pile up, irrelevant context can mix in and cause hallucinations.
| Command | Description |
|---|---|
/clear | Reset conversation. Essential before starting new tasks |
/compact | Compress context. For when conversations get long |
/cost | Check tokens/cost used so far |
/model | Switch models (Sonnet <> Opus) |
/config | Open settings |
/allowed-tools | Check currently allowed tools |
/status | Check IDE connection status, project path, etc. |
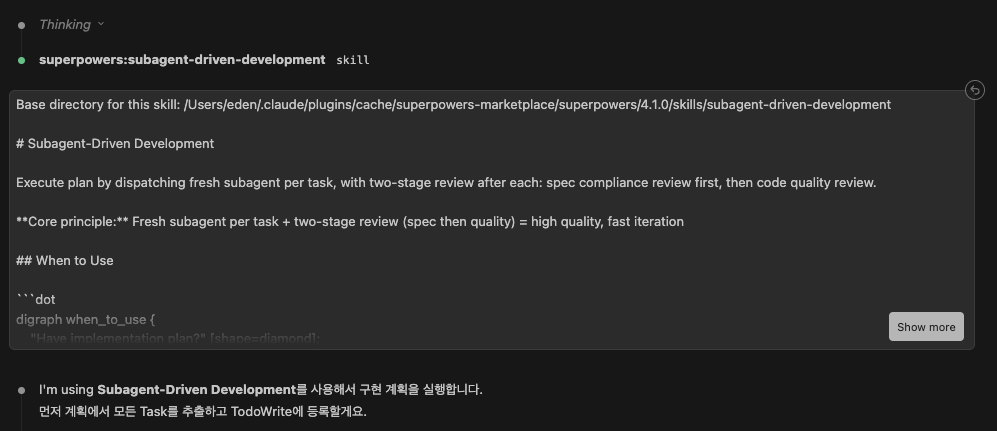
5. Automate Brainstorming with Superpowers
Superpowers is a plugin that adds extra capabilities to Claude Code.
Installation
Just give Claude the GitHub link and say "install superpowers for me." It'll figure it out.
How to use
After installation, run /brainstorming and Claude will automatically enter /subagent-driven-development mode. Multiple sub-agents collaborate to flesh out ideas and even draft implementation plans. Super useful when you need to design a complex feature from scratch.
6. Parallel Work with Multi-Session
You can open multiple terminals and assign different tasks to each one. Bug fix on one side, new feature development on the other.
Using Git Worktree
If you need fully isolated environments, use Git Worktree. Run separate Claude Code sessions in each worktree and they won't interfere with each other.
# Create a worktree with a new branch
git worktree add ../project-feature feature-branch

# Run Claude Code in that folder
cd ../project-feature
claude
7. Effective Prompting Habits
-
Ask for a plan first
Don't ask for code right away. Have Claude lay out a plan first.
Before implementing this feature, explain your plan first. Which files need to be modified and in what order? -
Use "think hard"
For complex problems, you can make Claude think more deeply.
Think hard about the edge cases in this authentication flow. -
Request tests alongside the code
Refactor this function and write tests for it too.
8. Stay Safe with Checkpoints
Since Claude Code 2.0, there's a checkpoint feature. It auto-saves your code state with every prompt.
Esctwice: Roll back to the previous checkpoint/rewind: Restore to a specific point
This is useful when trying experimental refactors. That said, this doesn't replace Git -- it's a temporary recovery feature within the session. You should still commit important changes.
Wrapping Up
To summarize:
- settings.json to reduce repetitive Yes clicking
- CLAUDE.md to auto-load project context
- VS Code extension for a comfortable IDE experience
- Slash commands for session management
- Superpowers to automate brainstorming
- Multi-session for parallel work
- Plan first prompting habits
- Checkpoints for safe experimentation
Claude Code is genuinely comfortable once you set it up well. Invest 10 minutes in the initial setup and your workflow efficiency changes dramatically.
Written by
J
Sejin Jung
PM & builder. Director of Sapienta.